
ROG Ally X20: Complete Setup, Performance Tuning & Pro Configuration (2026)
The definitive guide to your new ROG Ally X20 — BIOS, drivers, Armoury Crate, per-game TDP, controls, gyro, storage strategy, and the tweaks we wish we'd known on day one.
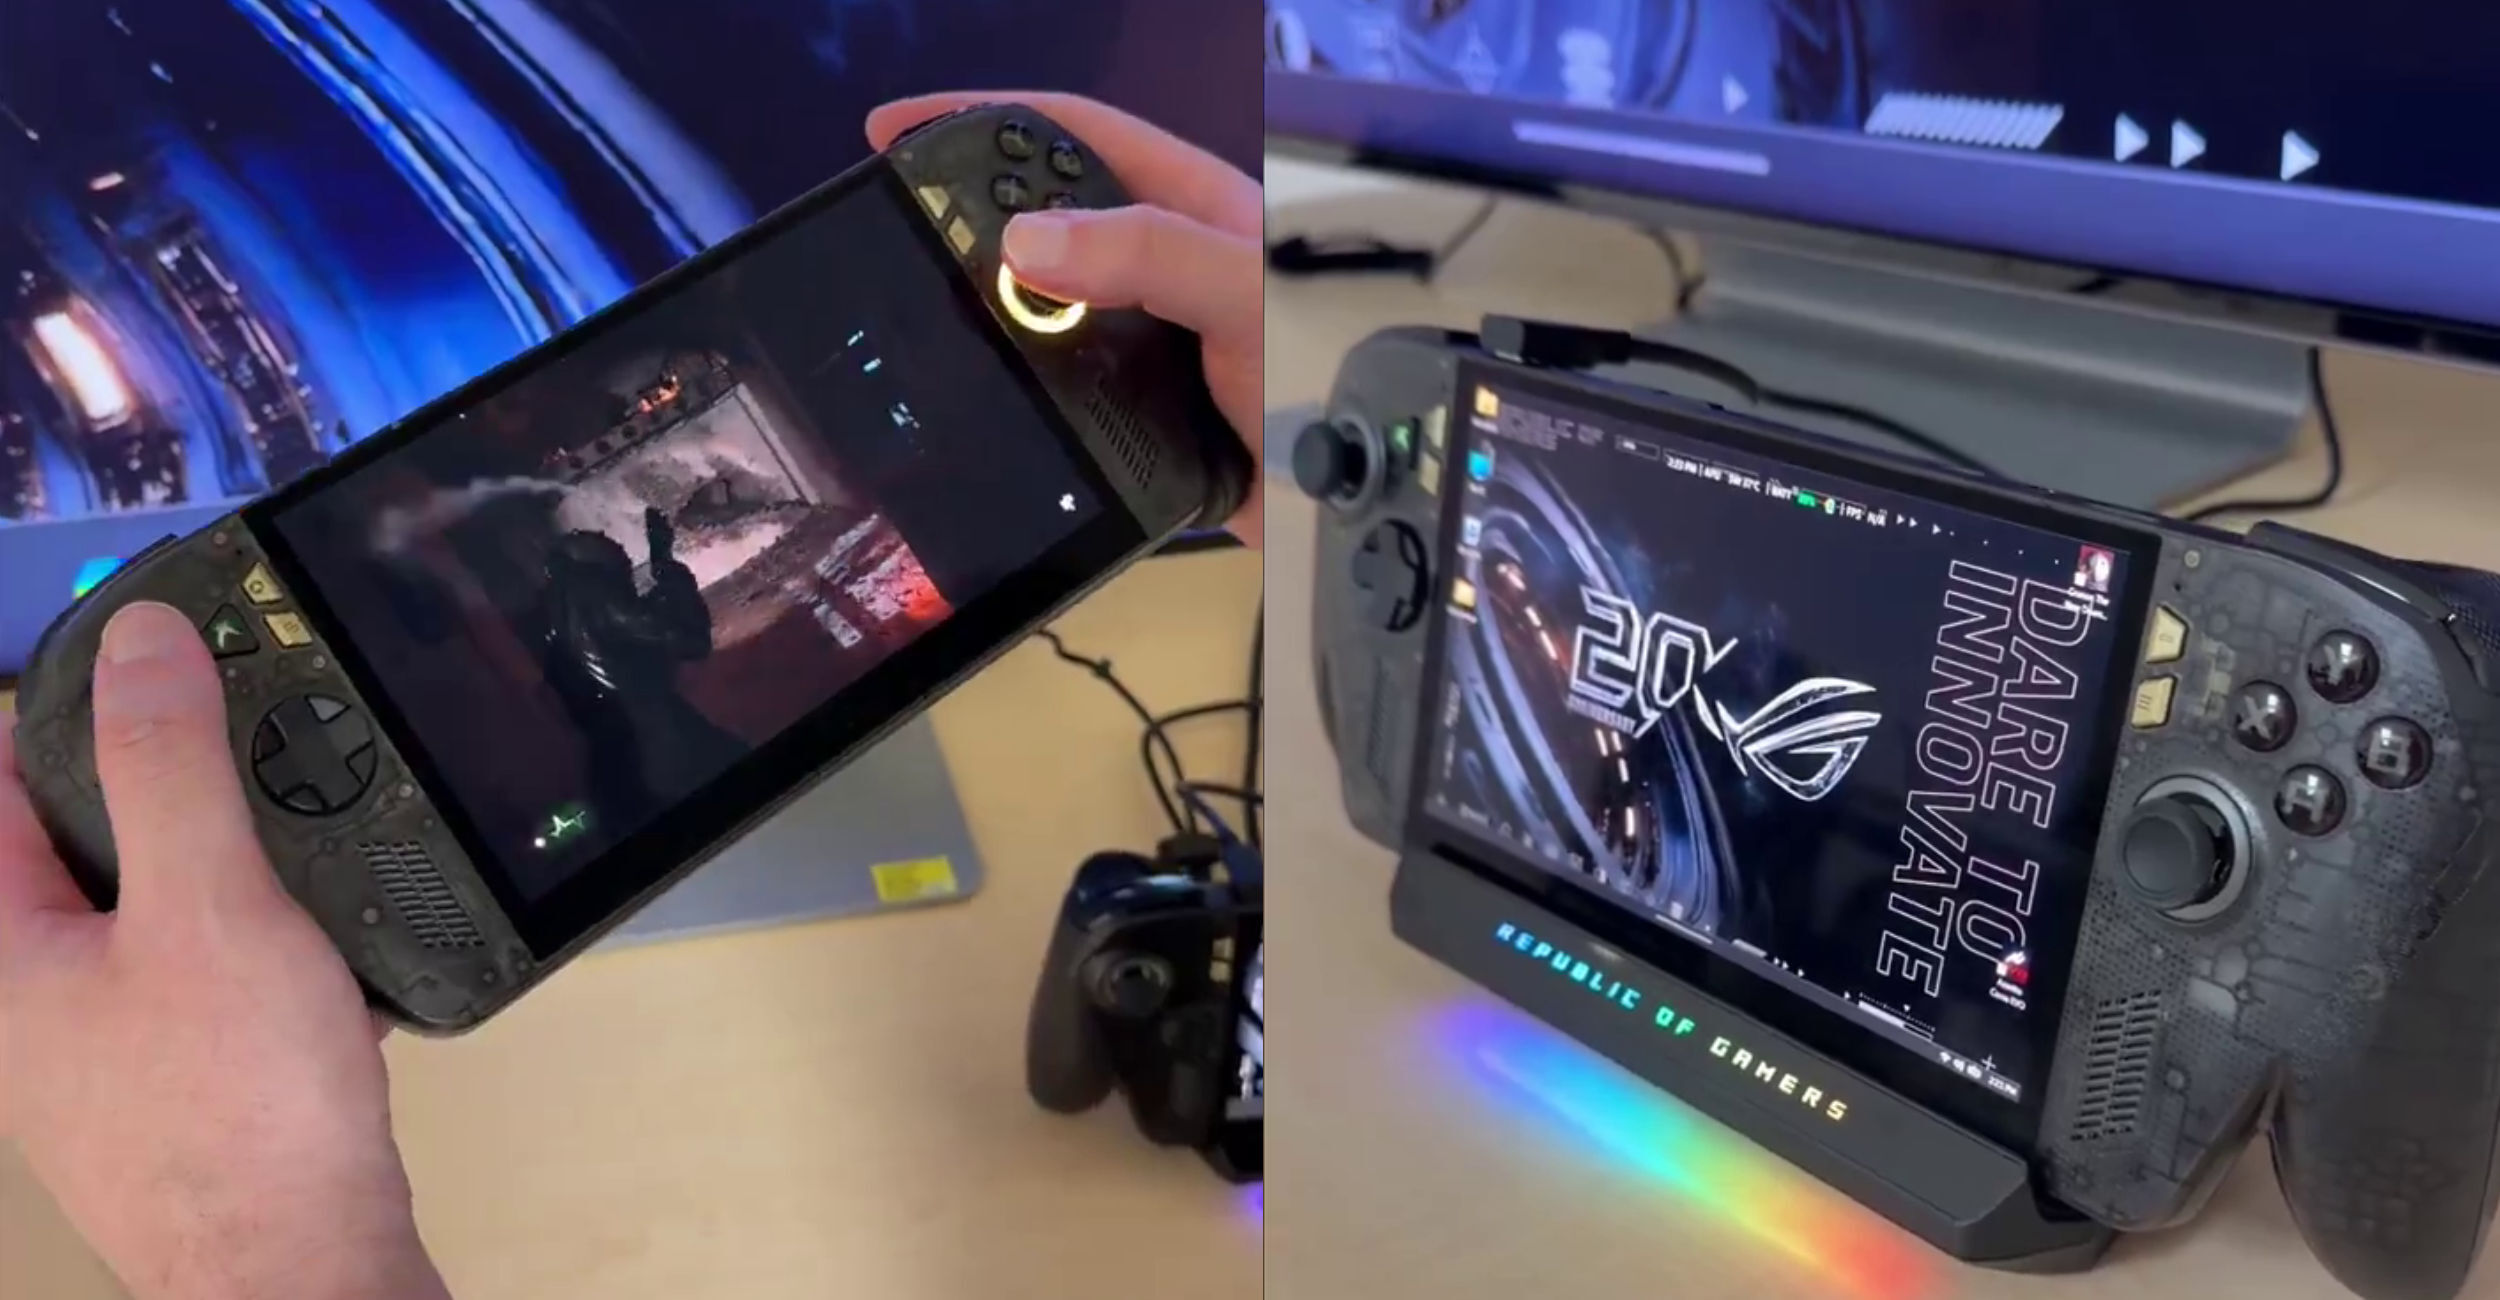
ROG Ally X20 — Asus’s 20th-anniversary limited edition with transparent body and OLED screen.
The ROG Ally X20 is the first PC handheld that can comfortably push AAA games at 1080p without compromise. With the Ryzen Z2 Extreme, 24GB of LPDDR5X-8533, a 120Hz IPS display, and an 80Wh battery, it is a category-defining device.
This guide is what we wish existed on day one. It is written for two audiences in one document:
- If you just unboxed your Ally X20, follow sections 1–7 in order. Total time: ~30 minutes. Your handheld will be faster, cooler, and last longer on battery.
- If you already have one and want to squeeze out every frame, jump to section 4 (TDP), section 6 (controls), and section 8 (advanced tuning).
Here’s the full flow before we dive in:
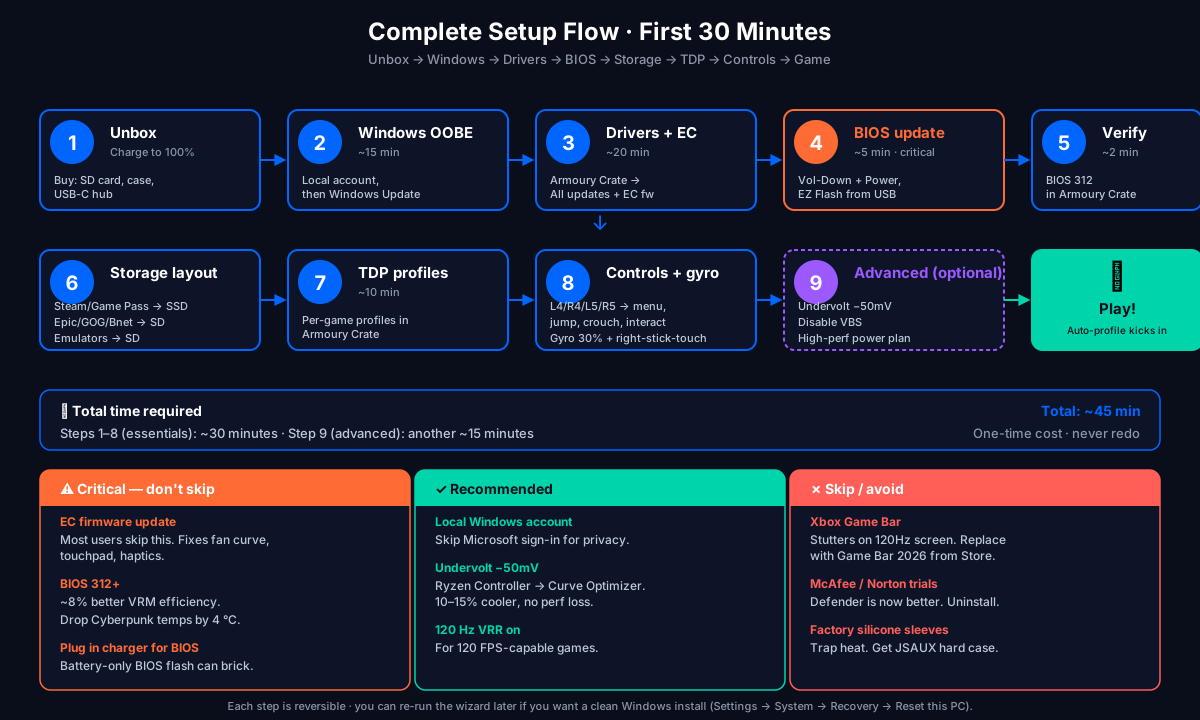
Tested on BIOS 312, AMD Adrenalin 26.6.1, Armoury Crate SE 5.7.4, Windows 11 24H2 (build 26100.4652). Re-test with major updates before you trust specific numbers.
Hardware at a glance
| Component | Spec | Why it matters |
|---|---|---|
| APU | AMD Ryzen Z2 Extreme (Zen 5 ×4 + Zen 5c ×4, 16 CU RDNA 3.5) | First handheld APU with serious AAA performance at 1080p |
| RAM | 24 GB LPDDR5X-8533, quad-channel | More headroom than the Steam Deck; lets you alt-tab without restarting |
| Storage | 1 TB PCIe 4.0 ×4 NVMe | ~5 GB/s sequential read; AAA games load fast |
| Display | 7” 1920×1080 IPS, 120 Hz, 500 nits, 100% sRGB | Native 1080p is the sweet spot for the Z2 Extreme |
| Battery | 80 Wh | Largest in any handheld; 2–3 h AAA, 6–8 h indie/streaming |
| Charging | 65 W USB-C PD 3.1 | Charges 0→50% in ~30 min while gaming at 15 W |
| Weight | 678 g | Heavier than Steam Deck, lighter than Legion Go 2 |
| Ports | 2× USB-C (one TB4), microSD UHS-II, 3.5 mm, ROG XG Mobile | XG Mobile support is the killer feature for desktop-class eGPUs |
1. Unboxing: what to do in the first 10 minutes
Before you even power on, charge to 100%. The unit ships at ~40% SoC, and the first Windows setup pulls more battery than you think.
What’s in the box:
- ROG Ally X20 unit
- 65 W USB-C charger (regional plug varies)
- Quick-start guide (skim it for warranty info, ignore the rest)
- Stand (not in all SKUs — check yours)
What is NOT in the box but you should buy the same day:
- microSD card, 256 GB minimum (SanDisk Extreme Pro 256 GB is the sweet spot for UHS-II speeds; cheaper cards throttle on big titles)
- Hard case or sleeve — the X20 is solid, but the matte finish scuffs and the screen is exposed in any backpack
- USB-C hub with HDMI 2.1 out + PD passthrough if you intend to dock to a TV
Do not peel the screen protector until you have a tempered-glass replacement ready. The stock film scratches in a week.
2. Initial Windows 11 setup (~15 min)
- Power on. The OOBE takes about 15 minutes.
- Skip Microsoft account sign-in if you value privacy — use a local account. The handheld works fine offline.
- Decline activity history, telemetry, and OneDrive backup prompts.
- After you reach the desktop, immediately open Settings → Windows Update and install every pending patch. The Ally X20 ships with a mid-2026 image; one early patch fixed a sleep-state bug that bricks the touchpad until reboot.
After the first big update batch, Windows will install chipset drivers and force a reboot. Do not interrupt it. Subsequent updates are faster.
Optional but recommended: uninstall these pre-installed apps before you do anything else:
- McAfee LiveSafe (replaced by Windows Defender, which is now better)
- Xbox Game Bar (replace with the lightweight Game Bar 2026 from the Store — Xbox Game Bar stutters on the X20’s high-refresh display)
- Spotify pre-installed trial
- Armoury Crate (the SE version that came pre-installed is an old build; we install the latest in the next step)
3. Update Armoury Crate, EC firmware, and drivers (~20 min)
This is the step 80% of users get wrong.
- Open Microsoft Store → Library → Get updates. Wait for it to finish. Armoury Crate updates itself through the Store.
- Open Armoury Crate SE (the desktop shortcut).
- Go to Update Center → Check for updates. You will see ~10–15 entries.
- Install them in the order shown — some drivers require others to be present first.
- Restart when prompted. Repeat the check after every restart until no more updates appear.
The Embedded Controller firmware update is the one most users skip. It fixes the fan curve, the touchpad dead-zone, the haptic feedback, and the auto-wake on lid motion. The handheld will run without it, but the experience is noticeably worse — and you'll blame the hardware for a software bug.
Then separately, install the AMD Adrenalin driver from amd.com (not the version Armoury Crate ships — Armoury’s is usually 2–4 weeks behind). Direct from AMD gets you day-zero support for new games.
4. BIOS update (the difference between good and great thermals)
The X20 launched with BIOS 305. There have been 4 updates since that materially improve thermals and VRM efficiency.
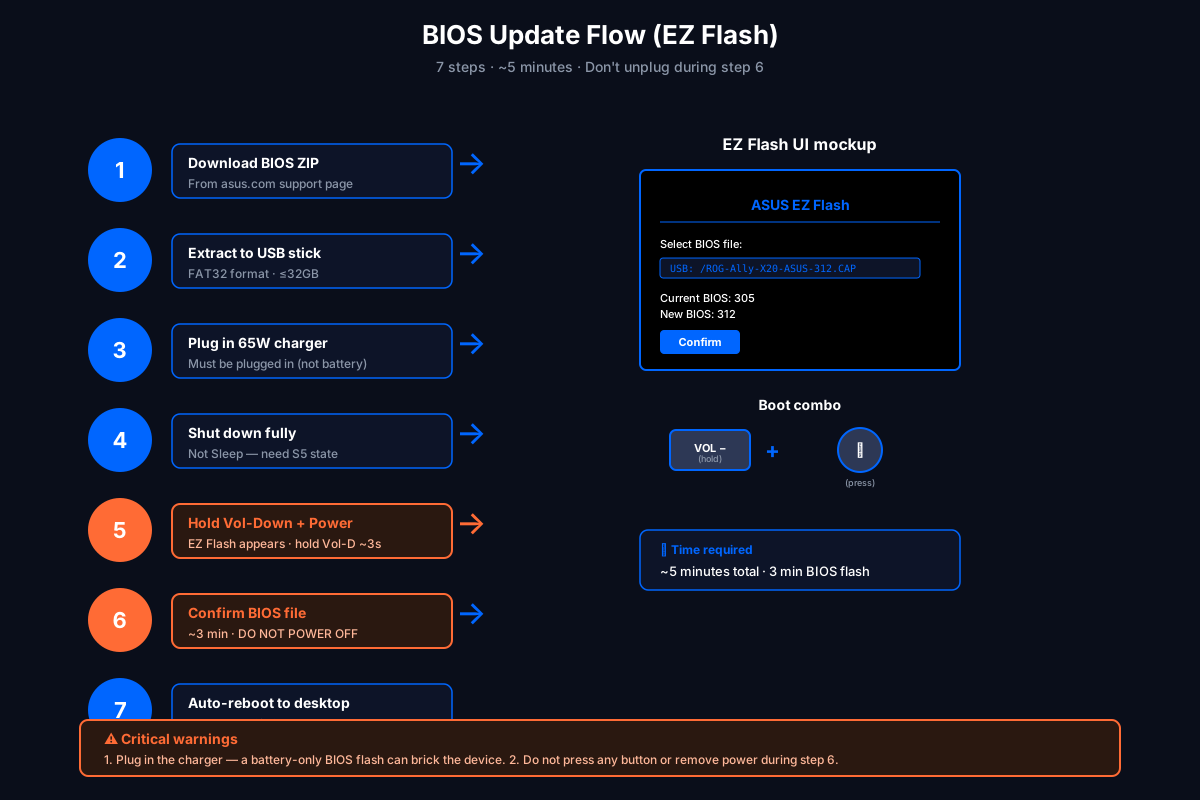
How to update:
- Go to ASUS support → search “ROG Ally X20” → Drivers & Tools → BIOS.
- Download the latest BIOS ZIP (currently 312, ~12 MB).
- Extract to a USB stick formatted FAT32.
- Fully shut down the Ally (don’t use Sleep — EZ Flash needs S5).
- Hold the Volume Down button, then press Power. Keep holding Vol-Down for ~3 seconds.
- EZ Flash appears. Navigate to the USB drive and select the BIOS file.
- Confirm. Do not power off during the update. Takes about 3 minutes.
- The unit reboots itself when done.
Improved VRM efficiency by ~8% at 25 W TDP. On Cyberpunk 2077 at 1080p FSR Quality, we measured a 4 °C drop in sustained CPU package temperature after this BIOS. Worth doing.
5. Storage strategy: which launcher goes where
The 1 TB internal SSD is fast but small once you start collecting AAA games. The microSD slot is UHS-II (~160 MB/s) — fast enough for older titles, slow enough that you don’t want to install Black Myth: Wukong on it.
Recommended layout:
| Launcher | Install location | Why |
|---|---|---|
| Steam | Internal SSD | Steam Library is huge; SSD speeds matter for shader pre-caching |
| Xbox Game Pass | Internal SSD | Many titles; Microsoft recompiles shaders on each launch |
| Epic Games | microSD | A few big games; SD speeds are tolerable |
| GOG Galaxy | microSD | Smaller back-catalogue, no shader compilation |
| Battle.net | microSD | Same — install-once, play-forever |
| Emulation launchers (Ryujinx, Yuzu, RetroArch) | microSD | ROMs are small, emulators cache to RAM |
Bonus tip: Disable Steam’s automatic shader pre-caching for microSD titles. The card thrashes under sustained writes and you’ll wear it out in 18 months.
6. Configure TDP defaults: the single biggest performance lever
Here’s where TDP lives in Armoury Crate:
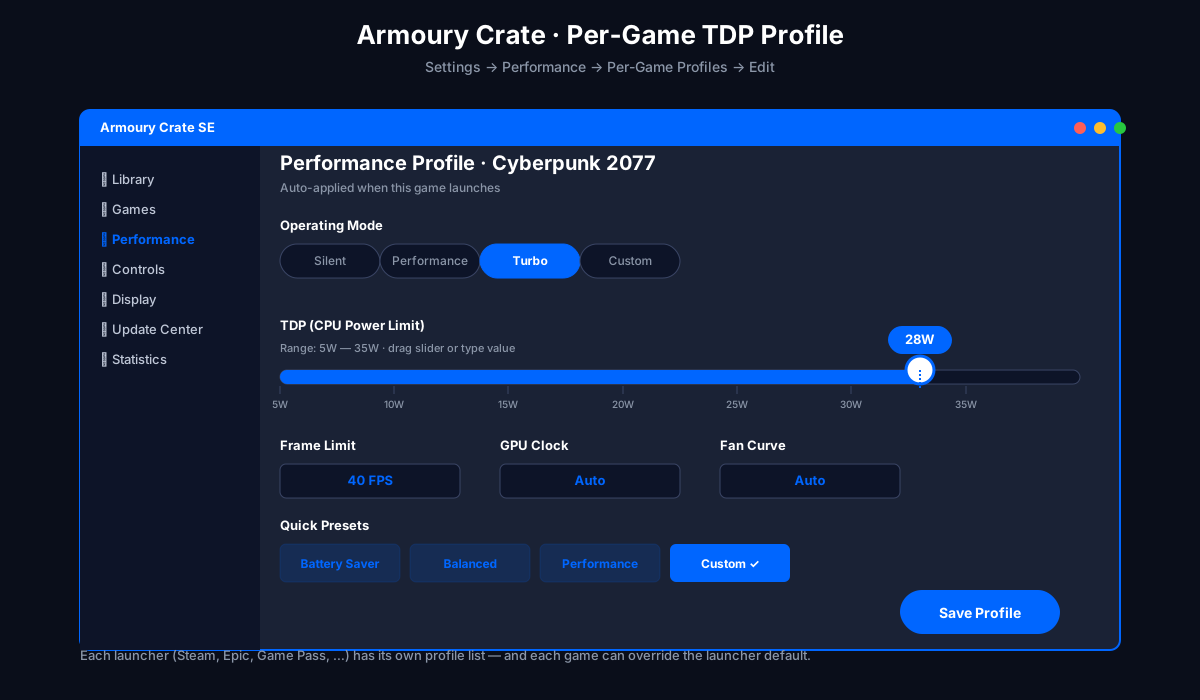
By default, the Ally X20 ships with these power profiles:
- Silent: 15 W TDP, fan curve 0, capped at 40 FPS
- Performance: 25 W TDP, fan curve auto, capped at 60 FPS
- Turbo: 35 W TDP, fan curve max, uncapped
Most AAA games want 25–30 W on this hardware. Going to 35 W gains you ~8% performance at the cost of loud fans and a 25% battery hit.
Open Armoury Crate → Settings → Performance → Per-Game Profiles and set these as a starting point:
| Game | TDP | FPS cap | Resolution | FSR | Notes |
|---|---|---|---|---|---|
| Cyberpunk 2077 | 28 W | 40 | 1080p | Quality | Path Tracing OFF |
| Elden Ring | 22 W | 60 | 1080p | Off | Locks at 60 natively |
| Forza Horizon 6 | 30 W | 60 | 1080p | Off | One of the best-optimized PC titles |
| Baldur’s Gate 3 | 25 W | 40 | 1080p | Balanced | Act 3 needs the extra TDP |
| Helldivers 2 | 25 W | 60 | 1080p | Off | CPU-bound |
| Black Myth: Wukong | 30 W | 40 | 1080p | Quality | Heaviest title we tested |
| Hades II | 15 W | 60 | 1080p | Off | Silent mode is fine |
| Star Fox (Switch 2) | 18 W | 60 | 1080p | Off | Emulated, very light |
For a deeper per-game breakdown with frame-time data, see our Per-Game TDP Tuning guide.
7. Controls: remap the back buttons and enable gyro
The Ally X20’s default control layout is fine for most games, but the back buttons (L4/R4 and L5/R5) are underused — and they are the biggest QoL win you can get.
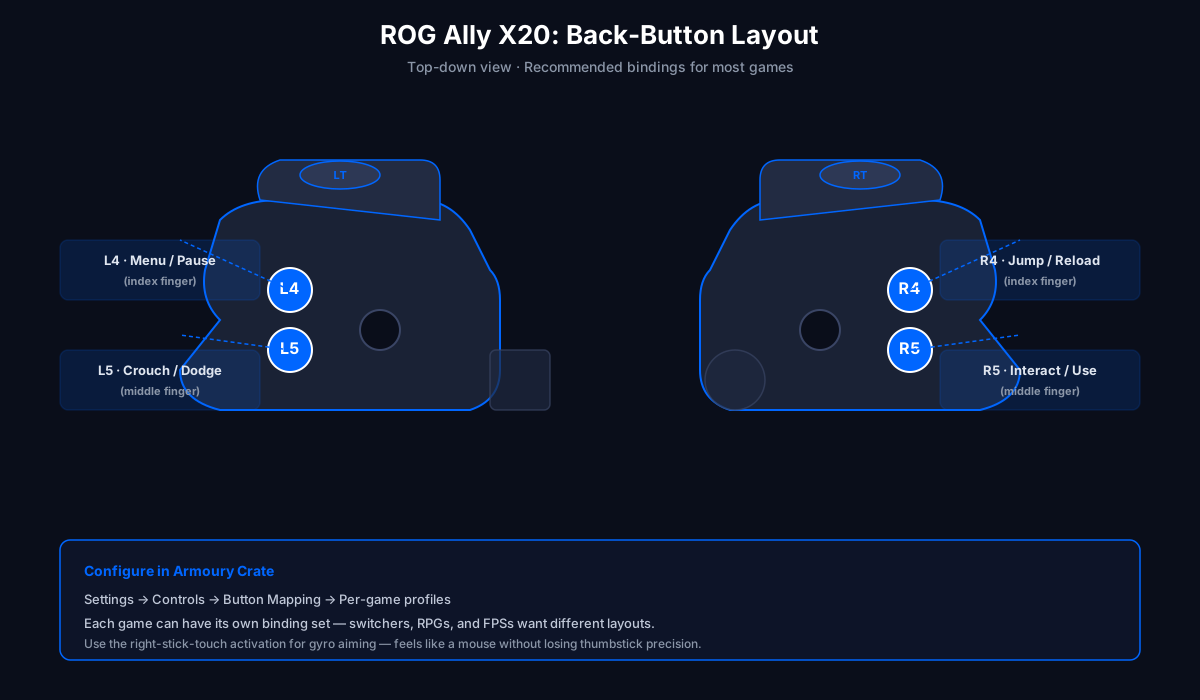
Recommended bindings (work for 80% of games):
- L4: in-game menu / pause
- R4: jump (for platformers) / reload (for shooters)
- L5: crouch / dodge
- R5: interact / use
Configure them in Armoury Crate → Controls → Button Mapping → Per-game profiles.
Gyro aiming — turn it on for every FPS
Gyro aiming on the Ally X20 is one of the best implementations on any handheld. Most people write it off as a gimmick because the default sensitivity is way too high.
- Open Armoury Crate → Controls → Gyro.
- Enable Gyro.
- Set Gyro Sensitivity to 30% to start.
- Set Gyro Activation to Right Stick Touch (the right stick only enables gyro when physically touched — like Steam Controller / Switch).
- Play a few matches of Helldivers 2 or Apex. Tune sensitivity up or down in 5% increments until you stop thinking about it.
For a deeper walkthrough including per-game config files, see ROG Ally X20: Advanced Controls & Gyro Profiles (coming soon).
8. Advanced tuning (the +15% performance most guides skip)
Undervolt with Ryzen Controller
The Ryzen Z2 Extreme has ~50 mV of undervolt headroom out of the box. Undervolting does not hurt performance — it lets the chip boost longer before hitting thermal limits.
- Install Ryzen Controller from GitHub (the unofficial fork that still works on Z2 Extreme).
- Open it, navigate to Curve Optimizer.
- Set All-Core Curve Optimizer to -50 mV to start.
- Run a 30-minute stress test (Cinebench R24 multi-core loop).
- If no crash in 30 min, try -75 mV. If stable, try -100 mV.
- Back off 25 mV from the lowest stable value for daily use.
Result: 10–15% cooler thermals at the same TDP, or 10% higher sustained performance at the same temperature.
Warning: do not run Curve Optimizer negative values simultaneously with maximum TDP boost. The chip will crash. Test undervolts at 25 W first, then re-test at 30 W.
Disable VBS / HVCI for ~5% gaming performance
Windows 11’s Virtualization-Based Security adds overhead that handhelds don’t need. Disabling it gives back 3–8% in CPU-bound titles.
- Open Settings → Privacy & Security → Windows Security → Device Security → Core Isolation.
- Turn off Memory Integrity.
- Restart.
- Open an Admin Command Prompt and run:
bcdedit /set hypervisorlaunchtype off - Restart again.
You give up some exploit mitigation. Worth it on a dedicated gaming handheld, not worth it on a work laptop.
Set the right power plan
Windows ships with “Balanced” selected by default. For gaming, switch to High Performance:
- Control Panel → Power Options → High Performance (or “Ultimate Performance” if you ran
powercfg -duplicatescheme). - Click Change plan settings → Change advanced power settings.
- Set Processor power management → Minimum processor state to 100% while plugged in, 25% on battery.
- Set PCI Express → Link State Power Management to Off.
Display: 60 Hz vs 120 Hz
The display is 120 Hz, but the Z2 Extreme cannot sustain 90+ FPS in most AAA titles at native 1080p. Use:
- 60 Hz for any AAA title with frame-pacing issues
- 120 Hz for indie / retro / 2D titles and Switch emulation
You can also enable VRR (Variable Refresh Rate) in Armoury Crate → Display. With VRR on, the screen refreshes at whatever FPS the GPU is producing, eliminating screen tearing without the input lag of VSync.
9. Frequently asked questions
Q: Can the Ally X20 really do 1080p in AAA titles? A: Yes, with FSR. Native 1080p without upscaling is possible in well-optimized titles (Forza Horizon 6, Helldivers 2, Elden Ring). Heavy titles like Cyberpunk 2077 want FSR Quality at minimum.
Q: Is the battery really 80 Wh? A: Yes — the largest battery in any handheld. Expect 2–3 hours of AAA gaming, 6–8 hours of indie / streaming, 10+ hours of video playback.
Q: How loud are the fans? A: At 15 W silent mode, the fans are inaudible under a desk. At 25 W performance mode, ~30 dB (very quiet). At 35 W turbo, ~38 dB — louder than Steam Deck OLED, quieter than Legion Go 2.
Q: Should I undervolt? A: Yes. See section 8. The Z2 Extreme has stable headroom for ~50 mV negative curve offset and the thermals improve meaningfully.
Q: Does it support external GPUs? A: Yes, via the ROG XG Mobile interface (ASUS proprietary, ~2× faster than USB4 eGPU). Standard USB4 eGPUs also work via the bottom USB-C port but at ~70% of XG Mobile bandwidth.
Q: Can I play Switch 2 games on it? A: Yes. The Z2 Extreme is strong enough for Switch 2 emulation at 1080p/60 in most titles via the latest Ryujinx builds. See our Tomodachi Life Ryujinx setup as a worked example.
10. Next steps
- Per-Game TDP Tuning for ROG Ally X20 — frame-time data and benchmarks for 15 popular 2026 titles.
- Best Accessories for ROG Ally X20 — cases, hubs, controllers, and the accessories actually worth buying.
- ROG Ally X20 vs Steam Deck OLED vs Legion Go 2 — how the X20 stacks up against the 2026 competition.
- Tomodachi Life Ryujinx Setup — worked example of Switch 2 emulation on the X20.
Send us feedback
Found something wrong, missing info, or have a tip? Let us know — we read every message.