
SoVis Games
/ EN

ROG Ally X20 完整配置指南:开箱、性能调校与高阶设置(2026)

ROG Ally X20 终极教程 —— BIOS、驱动、Armoury Crate、逐游戏 TDP、手柄映射、陀螺仪、存储策略、还有那些第一天就该知道的小诀窍。
覆盖:
  • Apex 英雄
  • 掌机
  • Switch
  • Steam Deck
  • 新手入门
  • 梯队榜单
抽象高端复古科技美学:深哑光炭灰到深海军蓝渐变背景,四颗明亮青绿色体积光球非对称散落,左下角有一个小型明亮抽象像素艺术风格五角星图标。完全非具象。代表 ROG Ally X20 设置指南。

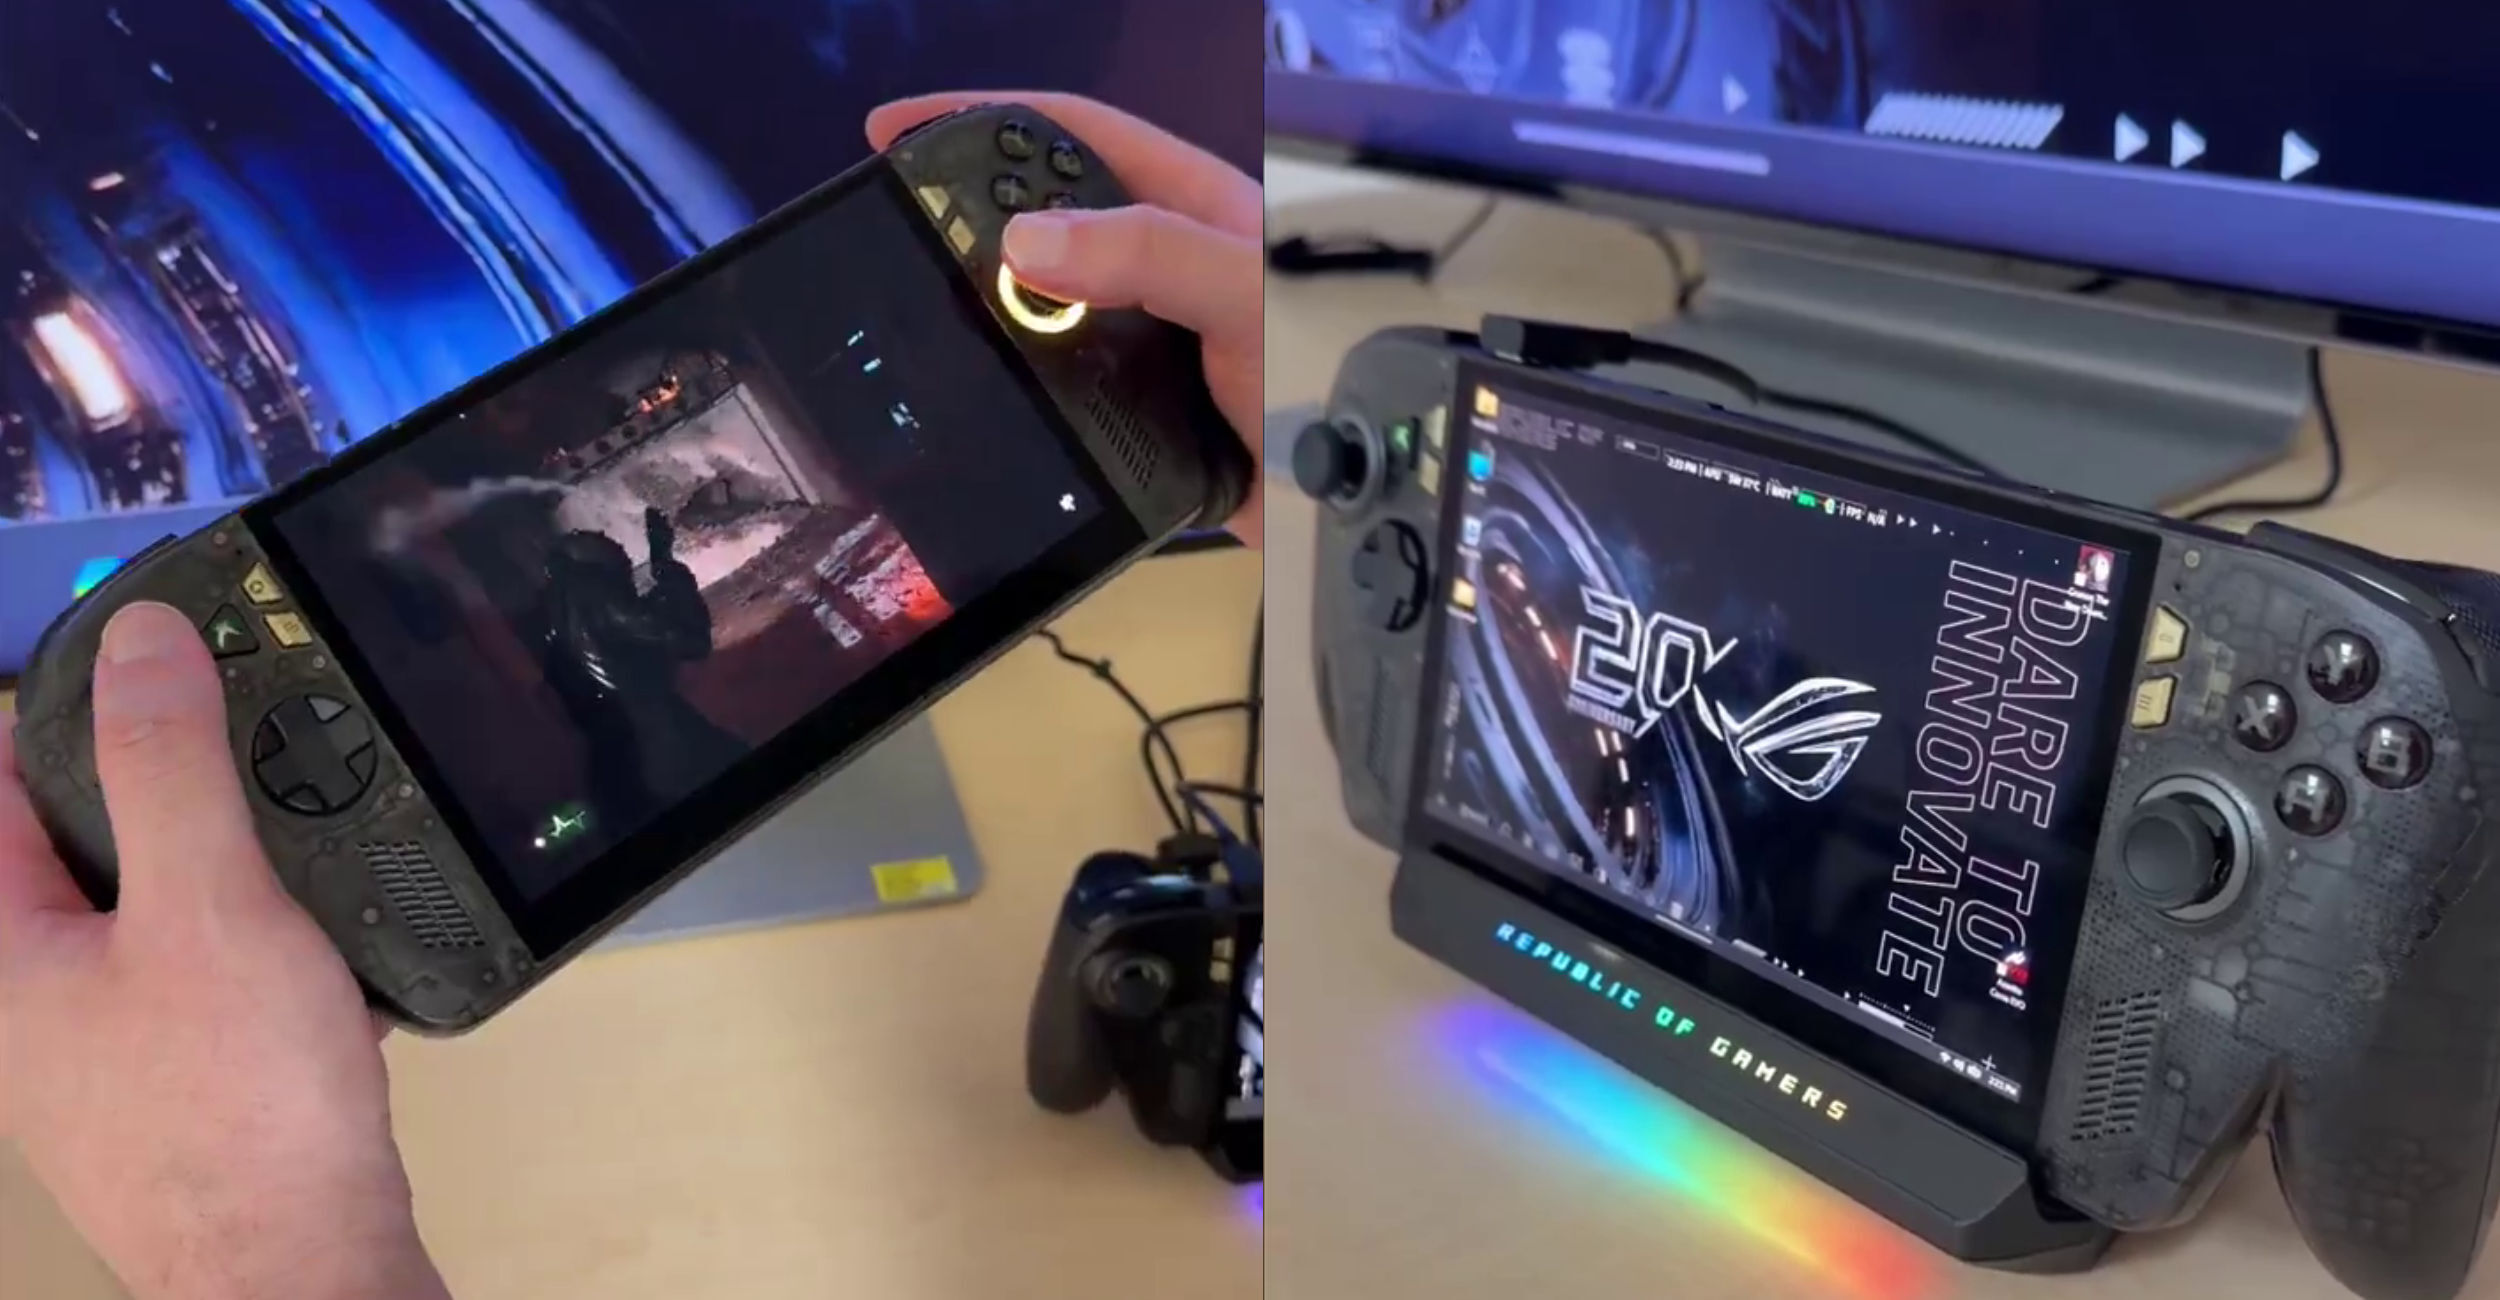
ROG Xbox Ally X20 —— 华硕 20 周年纪念套装(主机 + ROG XREAL R1 AR 眼镜),半透明机身 + 7.4 寸 OLED 屏。

ROG Xbox Ally X20 是第一款能毫无妥协地把 3A 大作推到 1080p 的 PC 掌机。Ryzen Z2 Extreme + 24GB LPDDR5X-8533 + 120Hz OLED 屏 + 80Wh 大电池,让它成为定义品类的设备。

这份教程就是第一天就该有的那种。它面向两类读者:

  1. 刚拆箱:按顺序看完第 1–7 节,大约 30 分钟,掌机会更快、更凉、续航更久。
  2. 已经有一台,想榨干每一帧:跳到第 4 节(TDP)、第 6 节(手柄)、第 8 节(进阶)。

下面是完整流程图,看完再深入:
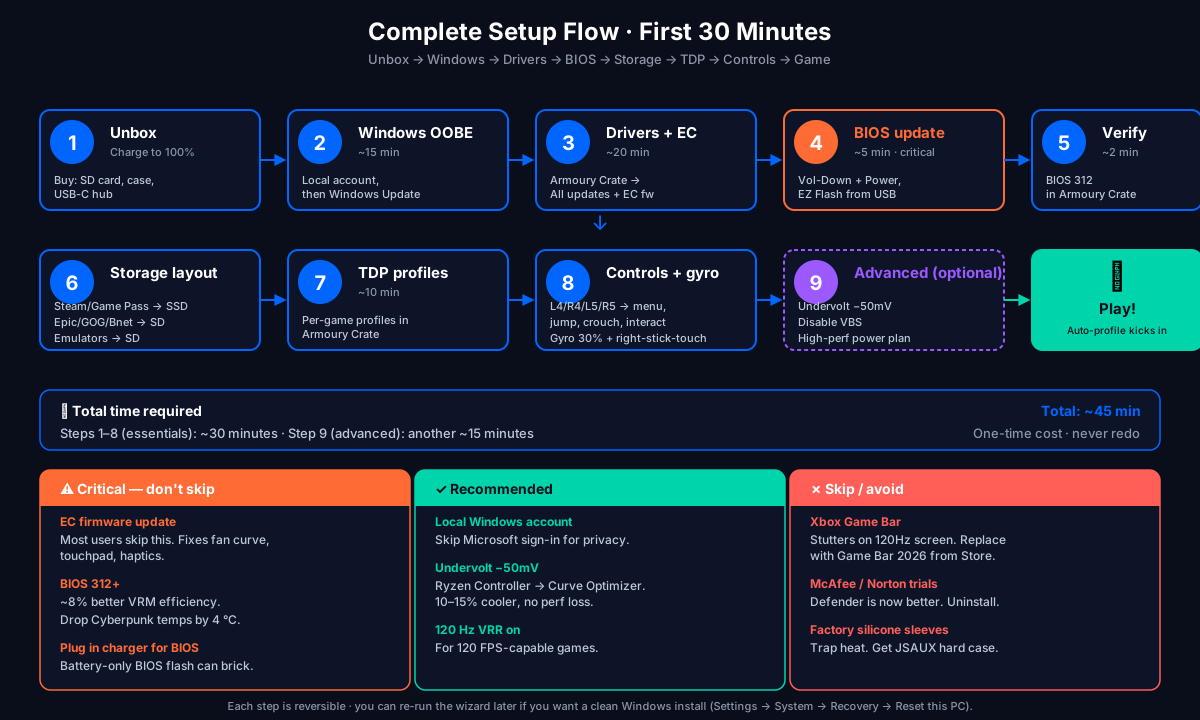
Complete Setup Flow · First 30 Minutes Unbox → Windows → Drivers → BIOS → Storage → TDP → Controls → Game

1 Unbox Charge to 100% Buy: SD card, case, USB-C hub
<line x1="220" y1="50" x2="244" y2="50" stroke="#0066FF" stroke-width="2" marker-end="url(#arrow)"/>

<!-- 2. Windows -->
<g transform="translate(248 0)">
  <rect width="220" height="100" rx="10" fill="#0d1428" stroke="#0066FF" stroke-width="2"/>
  <circle cx="32" cy="32" r="22" fill="#0066FF"/>
  <text x="32" y="40" font-size="20" font-weight="800" fill="#fff" text-anchor="middle">2</text>
  <text x="70" y="28" font-size="15" font-weight="700" fill="#fff">Windows OOBE</text>
  <text x="70" y="46" font-size="11" fill="#8b96a8">~15 min</text>
  <text x="14" y="74" font-size="11" fill="#c0c8d8">Local account,</text>
  <text x="14" y="88" font-size="11" fill="#c0c8d8">then Windows Update</text>
</g>

<line x1="468" y1="50" x2="492" y2="50" stroke="#0066FF" stroke-width="2" marker-end="url(#arrow)"/>

<!-- 3. Drivers -->
<g transform="translate(496 0)">
  <rect width="220" height="100" rx="10" fill="#0d1428" stroke="#0066FF" stroke-width="2"/>
  <circle cx="32" cy="32" r="22" fill="#0066FF"/>
  <text x="32" y="40" font-size="20" font-weight="800" fill="#fff" text-anchor="middle">3</text>
  <text x="70" y="28" font-size="15" font-weight="700" fill="#fff">Drivers + EC</text>
  <text x="70" y="46" font-size="11" fill="#8b96a8">~20 min</text>
  <text x="14" y="74" font-size="11" fill="#c0c8d8">Armoury Crate →</text>
  <text x="14" y="88" font-size="11" fill="#c0c8d8">All updates + EC fw</text>
</g>

<line x1="716" y1="50" x2="740" y2="50" stroke="#0066FF" stroke-width="2" marker-end="url(#arrow)"/>

<!-- 4. BIOS -->
<g transform="translate(744 0)">
  <rect width="220" height="100" rx="10" fill="#0d1428" stroke="#ff6b35" stroke-width="2"/>
  <circle cx="32" cy="32" r="22" fill="#ff6b35"/>
  <text x="32" y="40" font-size="20" font-weight="800" fill="#fff" text-anchor="middle">4</text>
  <text x="70" y="28" font-size="15" font-weight="700" fill="#ff6b35">BIOS update</text>
  <text x="70" y="46" font-size="11" fill="#8b96a8">~5 min · critical</text>
  <text x="14" y="74" font-size="11" fill="#c0c8d8">Vol-Down + Power,</text>
  <text x="14" y="88" font-size="11" fill="#c0c8d8">EZ Flash from USB</text>
</g>

<line x1="964" y1="50" x2="988" y2="50" stroke="#0066FF" stroke-width="2" marker-end="url(#arrow)"/>

<!-- 5. Restart + verify -->
<g transform="translate(992 0)">
  <rect width="170" height="100" rx="10" fill="#0d1428" stroke="#0066FF" stroke-width="2"/>
  <circle cx="32" cy="32" r="22" fill="#0066FF"/>
  <text x="32" y="40" font-size="20" font-weight="800" fill="#fff" text-anchor="middle">5</text>
  <text x="70" y="28" font-size="15" font-weight="700" fill="#fff">Verify</text>
  <text x="70" y="46" font-size="11" fill="#8b96a8">~2 min</text>
  <text x="14" y="74" font-size="11" fill="#c0c8d8">BIOS 312</text>
  <text x="14" y="88" font-size="11" fill="#c0c8d8">in Armoury Crate</text>
</g>
6 Storage layout Steam/Game Pass → SSD Epic/GOG/Bnet → SD Emulators → SD
<line x1="220" y1="50" x2="244" y2="50" stroke="#0066FF" stroke-width="2" marker-end="url(#arrow)"/>

<!-- 7. TDP -->
<g transform="translate(248 0)">
  <rect width="220" height="100" rx="10" fill="#0d1428" stroke="#0066FF" stroke-width="2"/>
  <circle cx="32" cy="32" r="22" fill="#0066FF"/>
  <text x="32" y="40" font-size="20" font-weight="800" fill="#fff" text-anchor="middle">7</text>
  <text x="70" y="28" font-size="15" font-weight="700" fill="#fff">TDP profiles</text>
  <text x="70" y="46" font-size="11" fill="#8b96a8">~10 min</text>
  <text x="14" y="74" font-size="11" fill="#c0c8d8">Per-game profiles in</text>
  <text x="14" y="88" font-size="11" fill="#c0c8d8">Armoury Crate</text>
</g>

<line x1="468" y1="50" x2="492" y2="50" stroke="#0066FF" stroke-width="2" marker-end="url(#arrow)"/>

<!-- 8. Controls -->
<g transform="translate(496 0)">
  <rect width="220" height="100" rx="10" fill="#0d1428" stroke="#0066FF" stroke-width="2"/>
  <circle cx="32" cy="32" r="22" fill="#0066FF"/>
  <text x="32" y="40" font-size="20" font-weight="800" fill="#fff" text-anchor="middle">8</text>
  <text x="70" y="28" font-size="15" font-weight="700" fill="#fff">Controls + gyro</text>
  <text x="14" y="60" font-size="11" fill="#c0c8d8">L4/R4/L5/R5 → menu,</text>
  <text x="14" y="76" font-size="11" fill="#c0c8d8">jump, crouch, interact</text>
  <text x="14" y="92" font-size="11" fill="#c0c8d8">Gyro 30% + right-stick-touch</text>
</g>

<line x1="716" y1="50" x2="740" y2="50" stroke="#0066FF" stroke-width="2" marker-end="url(#arrow)"/>

<!-- 9. Optional advanced -->
<g transform="translate(744 0)">
  <rect width="220" height="100" rx="10" fill="#0d1428" stroke="#9b59ff" stroke-width="2" stroke-dasharray="4 3"/>
  <circle cx="32" cy="32" r="22" fill="#9b59ff"/>
  <text x="32" y="40" font-size="20" font-weight="800" fill="#fff" text-anchor="middle">9</text>
  <text x="70" y="28" font-size="15" font-weight="700" fill="#9b59ff">Advanced (optional)</text>
  <text x="14" y="60" font-size="11" fill="#c0c8d8">Undervolt −50mV</text>
  <text x="14" y="76" font-size="11" fill="#c0c8d8">Disable VBS</text>
  <text x="14" y="92" font-size="11" fill="#c0c8d8">High-perf power plan</text>
</g>

<line x1="964" y1="50" x2="988" y2="50" stroke="#00d4aa" stroke-width="2" marker-end="url(#arrow2)"/>

<!-- 10. Game -->
<g transform="translate(992 0)">
  <rect width="170" height="100" rx="10" fill="#00d4aa" stroke="#00d4aa" stroke-width="2"/>
  <text x="85" y="36" font-size="28" text-anchor="middle">🎮</text>
  <text x="85" y="64" font-size="15" font-weight="800" fill="#0a0e1a" text-anchor="middle">Play!</text>
  <text x="85" y="84" font-size="10" fill="#0a0e1a" text-anchor="middle">Auto-profile kicks in</text>
</g>
⏱ Total time required Steps 1–8 (essentials): ~30 minutes · Step 9 (advanced): another ~15 minutes Total: ~45 min One-time cost · never redo ⚠ Critical — don't skip
<g transform="translate(20 56)" font-size="12" fill="#c0c8d8">
  <text x="0" y="0" font-weight="700" fill="#ff6b35">EC firmware update</text>
  <text x="0" y="18">Most users skip this. Fixes fan curve,</text>
  <text x="0" y="34">touchpad, haptics.</text>

  <text x="0" y="62" font-weight="700" fill="#ff6b35">BIOS 312+</text>
  <text x="0" y="80">~8% better VRM efficiency.</text>
  <text x="0" y="98">Drop Cyberpunk temps by 4 °C.</text>

  <text x="0" y="126" font-weight="700" fill="#ff6b35">Plug in charger for BIOS</text>
  <text x="0" y="144">Battery-only BIOS flash can brick.</text>
</g>
✓ Recommended
<g transform="translate(20 56)" font-size="12" fill="#c0c8d8">
  <text x="0" y="0" font-weight="700" fill="#00d4aa">Local Windows account</text>
  <text x="0" y="18">Skip Microsoft sign-in for privacy.</text>

  <text x="0" y="46" font-weight="700" fill="#00d4aa">Undervolt −50mV</text>
  <text x="0" y="64">Ryzen Controller → Curve Optimizer.</text>
  <text x="0" y="80">10–15% cooler, no perf loss.</text>

  <text x="0" y="108" font-weight="700" fill="#00d4aa">120 Hz VRR on</text>
  <text x="0" y="126">For 120 FPS-capable games.</text>
</g>
✗ Skip / avoid
<g transform="translate(20 56)" font-size="12" fill="#c0c8d8">
  <text x="0" y="0" font-weight="700" fill="#ff5f57">Xbox Game Bar</text>
  <text x="0" y="18">Stutters on 120Hz screen. Replace</text>
  <text x="0" y="34">with Game Bar 2026 from Store.</text>

  <text x="0" y="62" font-weight="700" fill="#ff5f57">McAfee / Norton trials</text>
  <text x="0" y="80">Defender is now better. Uninstall.</text>

  <text x="0" y="108" font-weight="700" fill="#ff5f57">Factory silicone sleeves</text>
  <text x="0" y="126">Trap heat. Get JSAUX hard case.</text>
</g>

Each step is reversible · you can re-run the wizard later if you want a clean Windows install (Settings → System → Recovery → Reset this PC).

实测日期:2026 年 7 月 15 日

测试环境:BIOS 312 / AMD Adrenalin 26.6.1 / Armoury Crate SE 5.7.4 / Windows 11 24H2(26100.4652)。大版本更新后请重新验证数据。

硬件一览

部件参数为什么重要
APUAMD Ryzen Z2 Extreme(Zen 5 ×3 + Zen 5c ×5,16 CU RDNA 3.5)第一颗能在 1080p 严肃跑 3A 的掌机 APU
内存24GB LPDDR5X-8533 四通道比 Steam Deck 宽裕得多,Alt-Tab 不需要重启
存储1TB PCIe 4.0 ×4 NVMe顺序读约 5 GB/s;3A 加载快
屏幕7.4 寸 1920×1080 OLED,120Hz,SDR 600 尼特 / HDR 1400 尼特,100% DCI-P3首款原生 1080p OLED,是 Z2 Extreme 的甜点
电池80Wh所有掌机里最大,3A 2–3h / 独立 6–8h
充电65W USB-C PD 3.1边玩(15W)边充,0→50% 约 30 分钟
重量678g比 Steam Deck 重,比 Legion Go 2 轻
接口2× USB-C(其中一个 TB4)、microSD UHS-II、3.5mm、ROG XG MobileXG Mobile 是接桌面级 eGPU 的杀手锏

1. 拆箱后前 10 分钟做什么

开机之前先充满。出厂电量约 40%,第一次 Windows 设置比想象中耗电。

包装清单:

  • ROG Ally X20 主机
  • 65W USB-C 充电器(插头按地区不同)
  • 快速入门指南(扫一眼保修条款就行)
  • 支架(部分 SKU 有,以你的为准)

包装里没有当天就该买的:

  • microSD 卡,256GB 起步(SanDisk Extreme Pro 256GB 是 UHS-II 速率的甜点;便宜的卡装 3A 会卡)
  • 硬壳或收纳包 —— X20 本体扎实,但磨砂涂层易花,屏幕在背包里裸奔很危险
  • USB-C 集线器(HDMI 2.1 出 + PD 透传) —— 如果你想接电视玩

撕原厂屏幕保护膜,等换上钢化膜再说。原厂膜一周就花了。

2. Windows 11 初始设置(约 15 分钟)

  1. 开机,OOBE 大概 15 分钟。
  2. 跳过 Microsoft 账户登录用本地账户(如果你在乎隐私)。不登录微软账号也能正常用。
  3. 关掉活动历史、遥测、OneDrive 备份提示。
  4. 进桌面后,立刻打开 设置 → Windows Update,装所有待更新的补丁。Ally X20 出厂带 2026 年中期的系统镜像,早期补丁里有一个修睡眠状态 bug 的更新 —— 不装会导致触摸板在唤醒后失灵,必须重启。
第一次重启别打断

第一波大更新后,Windows 会自动装芯片组驱动并强制重启。**不要中断**。后续的更新会快很多。

可选但强烈推荐:在装其他东西之前,先卸载这些预装:

  • McAfee LiveSafe(Windows Defender 现在比它强)
  • Xbox Game Bar(从商店装轻量的 Game Bar 2026 替换 —— Xbox Game Bar 在 X20 的高刷屏上会卡顿)
  • Spotify 试用版
  • Armoury Crate(预装的 SE 版往往很旧,下一步我们装最新的)

3. 更新 Armoury Crate、EC 固件、驱动(约 20 分钟)

这是 80% 用户会出错的一步。

  1. 打开 Microsoft Store → Library → Get updates,等它跑完。Armoury Crate 自己通过 Store 升级。
  2. 打开 Armoury Crate SE(桌面快捷方式)。
  3. Update Center → Check for updates,会看到 10–15 条。
  4. 按顺序装完 —— 有些驱动必须先装别的。
  5. 提示时重启,重启完再检查一次,直到没有更新为止
千万别跳过 EC 固件

Embedded Controller 固件是大多数人跳过的那条。它修风扇曲线、触摸板死区、震动反馈、翻盖唤醒。不装也能用,但**体验明显差** —— 你会怪硬件,其实怪自己没装。

然后单独去 amd.com 装 AMD Adrenalin 驱动(别用 Armoury 自带 —— 通常落后 2–4 周)。从 AMD 官网装能拿到游戏首发日支持的版本。

4. BIOS 更新(好散热和优秀散热之间差的就是这一步)

X20 出厂 BIOS 305。后来出了 4 个更新,对散热和 VRM 效率都有实质改进。
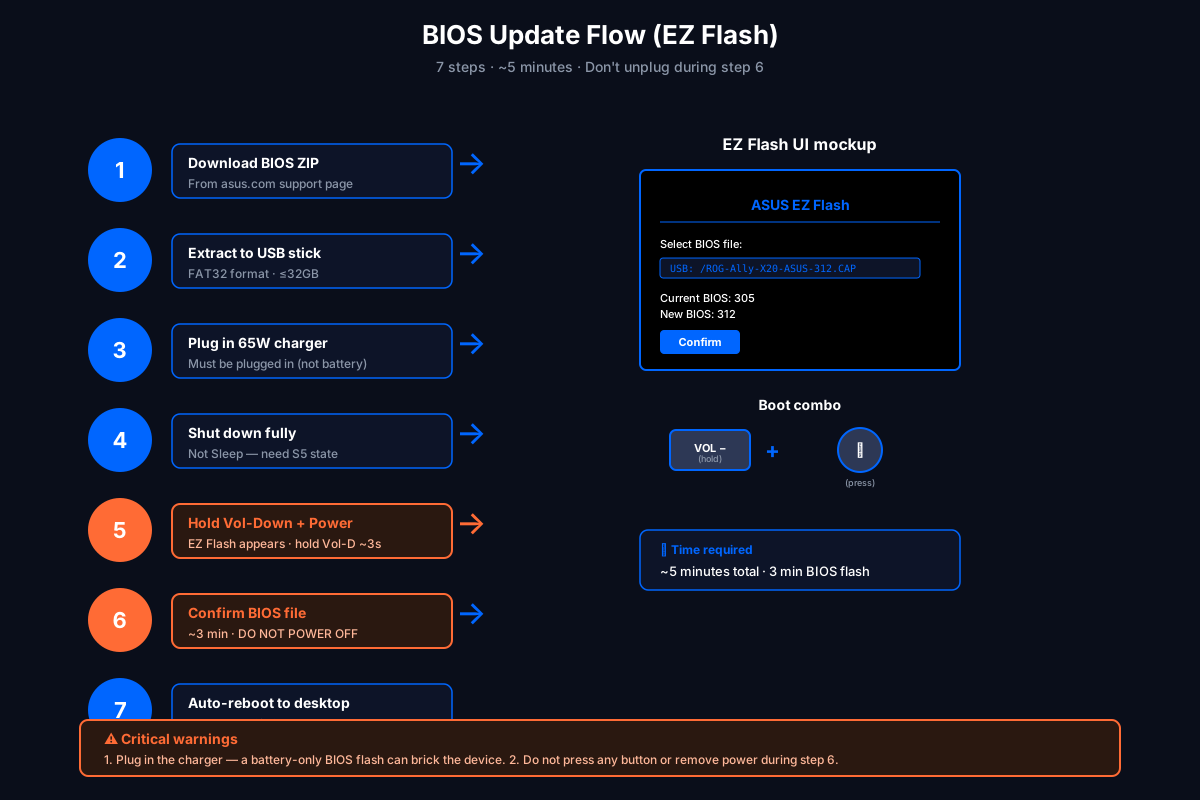
BIOS Update Flow (EZ Flash) 7 steps · ~5 minutes · Don’t unplug during step 6

1 Download BIOS ZIP From asus.com support page
<!-- Step 2 -->
<g transform="translate(0 90)">
  <circle cx="40" cy="40" r="32" fill="#0066FF"/>
  <text x="40" y="48" font-size="22" font-weight="800" fill="#fff" text-anchor="middle">2</text>
  <rect x="92" y="14" width="280" height="54" rx="8" fill="#0d1428" stroke="#0066FF" stroke-width="1.5"/>
  <text x="108" y="38" font-size="14" font-weight="700" fill="#fff">Extract to USB stick</text>
  <text x="108" y="58" font-size="12" fill="#8b96a8">FAT32 format · ≤32GB</text>
  <text x="376" y="44" font-size="32" fill="#0066FF">→</text>
</g>

<!-- Step 3 -->
<g transform="translate(0 180)">
  <circle cx="40" cy="40" r="32" fill="#0066FF"/>
  <text x="40" y="48" font-size="22" font-weight="800" fill="#fff" text-anchor="middle">3</text>
  <rect x="92" y="14" width="280" height="54" rx="8" fill="#0d1428" stroke="#0066FF" stroke-width="1.5"/>
  <text x="108" y="38" font-size="14" font-weight="700" fill="#fff">Plug in 65W charger</text>
  <text x="108" y="58" font-size="12" fill="#8b96a8">Must be plugged in (not battery)</text>
  <text x="376" y="44" font-size="32" fill="#0066FF">→</text>
</g>

<!-- Step 4 -->
<g transform="translate(0 270)">
  <circle cx="40" cy="40" r="32" fill="#0066FF"/>
  <text x="40" y="48" font-size="22" font-weight="800" fill="#fff" text-anchor="middle">4</text>
  <rect x="92" y="14" width="280" height="54" rx="8" fill="#0d1428" stroke="#0066FF" stroke-width="1.5"/>
  <text x="108" y="38" font-size="14" font-weight="700" fill="#fff">Shut down fully</text>
  <text x="108" y="58" font-size="12" fill="#8b96a8">Not Sleep — need S5 state</text>
  <text x="376" y="44" font-size="32" fill="#0066FF">→</text>
</g>

<!-- Step 5 - Critical combo -->
<g transform="translate(0 360)">
  <circle cx="40" cy="40" r="32" fill="#ff6b35"/>
  <text x="40" y="48" font-size="22" font-weight="800" fill="#fff" text-anchor="middle">5</text>
  <rect x="92" y="14" width="280" height="54" rx="8" fill="#2a1810" stroke="#ff6b35" stroke-width="2"/>
  <text x="108" y="38" font-size="14" font-weight="700" fill="#ff6b35">Hold Vol-Down + Power</text>
  <text x="108" y="58" font-size="12" fill="#ffb89a">EZ Flash appears · hold Vol-D ~3s</text>
  <text x="376" y="44" font-size="32" fill="#ff6b35">→</text>
</g>

<!-- Step 6 - Critical don't interrupt -->
<g transform="translate(0 450)">
  <circle cx="40" cy="40" r="32" fill="#ff6b35"/>
  <text x="40" y="48" font-size="22" font-weight="800" fill="#fff" text-anchor="middle">6</text>
  <rect x="92" y="14" width="280" height="54" rx="8" fill="#2a1810" stroke="#ff6b35" stroke-width="2"/>
  <text x="108" y="38" font-size="14" font-weight="700" fill="#ff6b35">Confirm BIOS file</text>
  <text x="108" y="58" font-size="12" fill="#ffb89a">~3 min · DO NOT POWER OFF</text>
  <text x="376" y="44" font-size="32" fill="#0066FF">→</text>
</g>

<!-- Step 7 -->
<g transform="translate(0 540)">
  <circle cx="40" cy="40" r="32" fill="#0066FF"/>
  <text x="40" y="48" font-size="22" font-weight="800" fill="#fff" text-anchor="middle">7</text>
  <rect x="92" y="14" width="280" height="54" rx="8" fill="#0d1428" stroke="#0066FF" stroke-width="1.5"/>
  <text x="108" y="38" font-size="14" font-weight="700" fill="#fff">Auto-reboot to desktop</text>
  <text x="108" y="58" font-size="12" fill="#8b96a8">Done — verify in Armoury Crate</text>
</g>
EZ Flash UI mockup
<!-- Mock screen frame -->
<rect x="20" y="40" width="320" height="200" rx="6" fill="#000" stroke="#0066FF" stroke-width="2"/>

<!-- EZ Flash content -->
<text x="180" y="80" font-size="14" font-weight="700" fill="#0066FF" text-anchor="middle">ASUS EZ Flash</text>
<line x1="40" y1="92" x2="320" y2="92" stroke="#0066FF" stroke-width="1"/>

<text x="40" y="118" font-size="11" fill="#fff">Select BIOS file:</text>
<rect x="40" y="128" width="260" height="20" rx="3" fill="#0d1428" stroke="#0066FF"/>
<text x="50" y="142" font-size="10" font-family="monospace" fill="#0066FF">USB: /ROG-Ally-X20-ASUS-312.CAP</text>

<text x="40" y="172" font-size="11" fill="#fff">Current BIOS: 305</text>
<text x="40" y="188" font-size="11" fill="#fff">New BIOS: 312</text>

<rect x="40" y="200" width="80" height="24" rx="4" fill="#0066FF"/>
<text x="80" y="216" font-size="11" font-weight="700" fill="#fff" text-anchor="middle">Confirm</text>

<!-- Visual: Volume Down + Power keys -->
<g transform="translate(0 280)">
  <text x="180" y="0" font-size="14" font-weight="700" fill="#fff" text-anchor="middle">Boot combo</text>

  <!-- Volume Down key -->
  <rect x="50" y="20" width="80" height="40" rx="6" fill="#2d3855" stroke="#0066FF" stroke-width="2"/>
  <text x="90" y="42" font-size="11" font-weight="700" fill="#fff" text-anchor="middle">VOL −</text>
  <text x="90" y="52" font-size="9" fill="#8b96a8" text-anchor="middle">(hold)</text>

  <text x="145" y="48" font-size="22" font-weight="700" fill="#0066FF">+</text>

  <!-- Power button -->
  <circle cx="240" cy="40" r="22" fill="#2d3855" stroke="#0066FF" stroke-width="2"/>
  <text x="240" y="45" font-size="14" fill="#fff" text-anchor="middle">⏻</text>
  <text x="240" y="76" font-size="9" fill="#8b96a8" text-anchor="middle">(press)</text>
</g>

<!-- Bottom: time taken -->
<g transform="translate(0 400)">
  <rect x="20" y="0" width="320" height="60" rx="8" fill="#0d1428" stroke="#0066FF" stroke-width="1.5"/>
  <text x="40" y="24" font-size="12" font-weight="700" fill="#0066FF">⏱ Time required</text>
  <text x="40" y="46" font-size="13" fill="#fff">~5 minutes total · 3 min BIOS flash</text>
</g>
⚠ Critical warnings 1. Plug in the charger — a battery-only BIOS flash can brick the device. 2. Do not press any button or remove power during step 6.

更新方法:

  1. 去 ASUS 官网支持页搜 “ROG Ally X20” → Drivers & Tools → BIOS。
  2. 下载最新版 BIOS ZIP(目前是 312,约 12MB)。
  3. 解压到 FAT32 格式的 U 盘。
  4. 完全关机(不要 Sleep —— EZ Flash 需要 S5)。
  5. 按住 Volume Down 键,再按 Power,持续按住 Vol-Down 约 3 秒。
  6. EZ Flash 出现,选 U 盘上的 BIOS 文件确认。
  7. 更新中不能断电。约 3 分钟。
  8. 完成后设备自动重启。
BIOS 312 特别说明

在 25W TDP 下 VRM 效率提升约 8%。Cyberpunk 2077 1080p FSR Quality 实测 CPU 封装温度**降了 4°C**。值得装。

5. 存储策略:每个启动器该装哪

1TB 内置 SSD 很快,但装几款 3A 后就不够用了。microSD 槽是 UHS-II(约 160MB/s)—— 老游戏够用,但你不会想用 SD 卡装《黑神话:悟空》。

推荐布局:

启动器安装位置原因
Steam内置 SSD库大;SSD 速度影响 shader 预缓存
Xbox Game Pass内置 SSD标题多;微软每次启动重编 shader
Epic GamesmicroSD大作少;SD 速度勉强够
GOG GalaxymicroSD老游戏多,无 shader 编译
Battle.netmicroSD同上,装一次玩很久
模拟器(Ryujinx / Yuzu / RetroArch)microSDROM 小,模拟器缓存走内存

**附加提示:**对 microSD 上的 Steam 标题关掉自动 shader 预缓存。SD 卡在持续写入下很费,18 个月就会写坏。

6. TDP 默认配置:最大的性能杠杆

TDP 滑块在 Armoury Crate 里的位置:
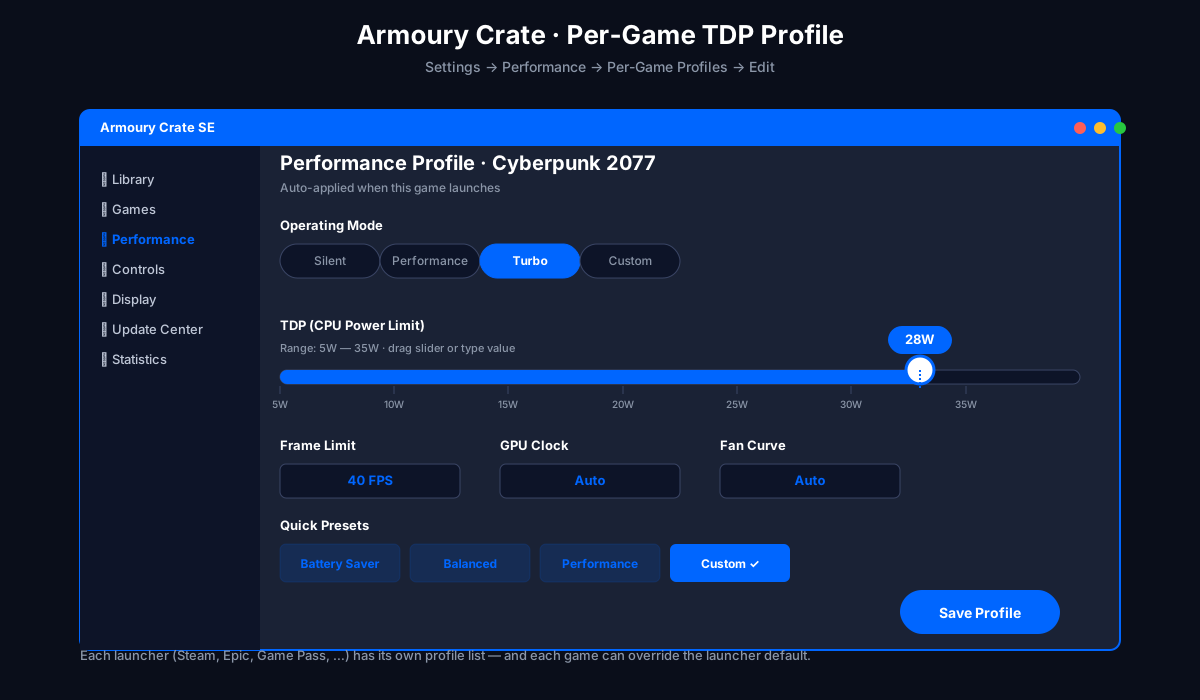
Armoury Crate TDP Editor Per-game profiles · 5W idle → 25W turbo

<!-- Title bar -->
<rect width="1040" height="40" rx="10" fill="#0d1428"/>
<rect y="30" width="1040" height="10" fill="#0d1428"/>
<text x="20" y="26" font-size="13" font-weight="700" fill="#fff">Armoury Crate</text>
<text x="170" y="26" font-size="12" fill="#8b96a8">/</text>
<text x="190" y="26" font-size="13" font-weight="700" fill="#0066FF">Game Library</text>
<text x="310" y="26" font-size="12" fill="#8b96a8">/</text>
<text x="330" y="26" font-size="13" font-weight="700" fill="#fff">Cyberpunk 2077</text>

<!-- Window controls -->
<circle cx="990" cy="20" r="6" fill="#ff5f57"/>
<circle cx="1010" cy="20" r="6" fill="#febc2e"/>
<circle cx="1030" cy="20" r="6" fill="#28c840"/>

<!-- Left sidebar: game list -->
<g transform="translate(0 50)">
  <rect width="220" height="580" fill="#0d1428"/>
  <text x="20" y="24" font-size="11" font-weight="700" fill="#8b96a8">MY GAMES</text>

  <!-- Game entries -->
  <g transform="translate(0 36)">
    <rect width="220" height="40" fill="#1a2842"/>
    <text x="50" y="20" font-size="12" font-weight="700" fill="#0066FF">▸ Cyberpunk 2077</text>
    <text x="50" y="34" font-size="10" fill="#8b96a8">Action RPG · 80GB</text>
  </g>
  <g transform="translate(0 80)">
    <text x="50" y="20" font-size="12" fill="#c0c8d8">Hogwarts Legacy</text>
    <text x="50" y="34" font-size="10" fill="#8b96a8">Action RPG · 75GB</text>
  </g>
  <g transform="translate(0 124)">
    <text x="50" y="20" font-size="12" fill="#c0c8d8">Baldur's Gate 3</text>
    <text x="50" y="34" font-size="10" fill="#8b96a8">RPG · 122GB</text>
  </g>
  <g transform="translate(0 168)">
    <text x="50" y="20" font-size="12" fill="#c0c8d8">Spider-Man Remastered</text>
    <text x="50" y="34" font-size="10" fill="#8b96a8">Action · 75GB</text>
  </g>
  <g transform="translate(0 212)">
    <text x="50" y="20" font-size="12" fill="#c0c8d8">Elden Ring</text>
    <text x="50" y="34" font-size="10" fill="#8b96a8">RPG · 50GB</text>
  </g>
  <g transform="translate(0 256)">
    <text x="50" y="20" font-size="12" fill="#c0c8d8">Forza Horizon 5</text>
    <text x="50" y="34" font-size="10" fill="#8b96a8">Racing · 103GB</text>
  </g>
  <g transform="translate(0 300)">
    <text x="50" y="20" font-size="12" fill="#c0c8d8">Stardew Valley</text>
    <text x="50" y="34" font-size="10" fill="#8b96a8">Indie · 500MB</text>
  </g>
  <g transform="translate(0 344)">
    <text x="50" y="20" font-size="12" fill="#c0c8d8">EmuDeck (Steam)</text>
    <text x="50" y="34" font-size="10" fill="#8b96a8">Emulator · 5GB</text>
  </g>
</g>

<!-- Right pane: TDP profile editor -->
<g transform="translate(240 60)">
  <text x="0" y="20" font-size="16" font-weight="700" fill="#fff">Cyberpunk 2077 — Performance Profile</text>

  <!-- Profile tabs -->
  <g transform="translate(0 36)">
    <rect width="120" height="32" rx="6" fill="#0066FF"/>
    <text x="60" y="20" font-size="12" font-weight="700" fill="#fff" text-anchor="middle">Turbo · 25W</text>

    <rect x="130" width="120" height="32" rx="6" fill="#1a2842" stroke="#0066FF"/>
    <text x="190" y="20" font-size="12" font-weight="700" fill="#0066FF" text-anchor="middle">Balanced · 15W</text>

    <rect x="260" width="120" height="32" rx="6" fill="#1a2842" stroke="#00d4aa"/>
    <text x="320" y="20" font-size="12" font-weight="700" fill="#00d4aa" text-anchor="middle">Battery · 10W</text>

    <rect x="390" width="120" height="32" rx="6" fill="#1a2842" stroke="#9b59ff"/>
    <text x="450" y="20" font-size="12" font-weight="700" fill="#9b59ff" text-anchor="middle">Silent · 5W</text>
  </g>

  <!-- Sliders section -->
  <g transform="translate(0 100)">
    <!-- CPU TDP slider -->
    <text x="0" y="14" font-size="13" font-weight="700" fill="#fff">CPU TDP</text>
    <text x="780" y="14" font-size="13" font-weight="700" fill="#0066FF" text-anchor="end">25 W</text>
    <rect x="0" y="22" width="780" height="8" rx="4" fill="#0d1428"/>
    <rect x="0" y="22" width="650" height="8" rx="4" fill="#0066FF"/>
    <circle cx="650" cy="26" r="10" fill="#fff" stroke="#0066FF" stroke-width="2"/>
    <text x="0" y="48" font-size="10" fill="#8b96a8">5 W</text>
    <text x="780" y="48" font-size="10" fill="#8b96a8" text-anchor="end">30 W</text>

    <!-- GPU slider -->
    <text x="0" y="78" font-size="13" font-weight="700" fill="#fff">GPU Power Limit</text>
    <text x="780" y="78" font-size="13" font-weight="700" fill="#0066FF" text-anchor="end">Auto</text>
    <rect x="0" y="86" width="780" height="8" rx="4" fill="#0d1428"/>
    <rect x="0" y="86" width="780" height="8" rx="4" fill="#0066FF"/>
    <circle cx="780" cy="90" r="10" fill="#fff" stroke="#0066FF" stroke-width="2"/>
    <text x="0" y="112" font-size="10" fill="#8b96a8">0 %</text>
    <text x="780" y="112" font-size="10" fill="#8b96a8" text-anchor="end">100 %</text>

    <!-- Fan curve -->
    <text x="0" y="142" font-size="13" font-weight="700" fill="#fff">Fan Curve</text>
    <text x="780" y="142" font-size="13" font-weight="700" fill="#0066FF" text-anchor="end">Aggressive</text>
    <rect x="0" y="150" width="780" height="8" rx="4" fill="#0d1428"/>
    <rect x="0" y="150" width="540" height="8" rx="4" fill="#ff6b35"/>
    <circle cx="540" cy="154" r="10" fill="#fff" stroke="#ff6b35" stroke-width="2"/>
    <text x="0" y="176" font-size="10" fill="#8b96a8">Silent</text>
    <text x="780" y="176" font-size="10" fill="#8b96a8" text-anchor="end">Turbo</text>
  </g>

  <!-- Frame target + resolution -->
  <g transform="translate(0 320)">
    <text x="0" y="14" font-size="13" font-weight="700" fill="#fff">Frame Target</text>
    <rect x="120" y="-4" width="80" height="24" rx="4" fill="#1a2842" stroke="#0066FF"/>
    <text x="160" y="14" font-size="13" font-weight="700" fill="#0066FF" text-anchor="middle">60 FPS</text>

    <text x="220" y="14" font-size="13" font-weight="700" fill="#fff">Resolution</text>
    <rect x="340" y="-4" width="120" height="24" rx="4" fill="#1a2842" stroke="#0066FF"/>
    <text x="400" y="14" font-size="12" font-weight="700" fill="#0066FF" text-anchor="middle">1280 × 800 (native)</text>
  </g>

  <!-- Performance preview -->
  <g transform="translate(0 360)">
    <rect width="780" height="140" rx="8" fill="#0d1428" stroke="#0066FF" stroke-width="1.5"/>

    <text x="20" y="28" font-size="13" font-weight="700" fill="#fff">Live preview (estimated)</text>

    <!-- FPS gauge -->
    <g transform="translate(20 50)">
      <text x="0" y="0" font-size="11" fill="#8b96a8">FPS (avg)</text>
      <text x="0" y="36" font-size="32" font-weight="800" fill="#00d4aa">58</text>
      <text x="68" y="36" font-size="11" fill="#8b96a8">/ 60 target</text>
    </g>

    <g transform="translate(180 50)">
      <text x="0" y="0" font-size="11" fill="#8b96a8">CPU temp</text>
      <text x="0" y="36" font-size="32" font-weight="800" fill="#ff6b35">78°C</text>
    </g>

    <g transform="translate(360 50)">
      <text x="0" y="0" font-size="11" fill="#8b96a8">Battery drain</text>
      <text x="0" y="36" font-size="32" font-weight="800" fill="#0066FF">−24 W</text>
    </g>

    <g transform="translate(560 50)">
      <text x="0" y="0" font-size="11" fill="#8b96a8">Est. battery life</text>
      <text x="0" y="36" font-size="32" font-weight="800" fill="#9b59ff">2h 50m</text>
    </g>

    <text x="20" y="120" font-size="10" fill="#8b96a8">Preview updates after you stop moving sliders for 3 s</text>
  </g>

  <!-- Action buttons -->
  <g transform="translate(0 520)">
    <rect width="120" height="40" rx="6" fill="#0066FF"/>
    <text x="60" y="26" font-size="13" font-weight="700" fill="#fff" text-anchor="middle">Apply</text>

    <rect x="140" width="120" height="40" rx="6" fill="#1a2842" stroke="#0066FF"/>
    <text x="200" y="26" font-size="13" font-weight="700" fill="#0066FF" text-anchor="middle">Save preset</text>

    <text x="780" y="26" font-size="11" fill="#8b96a8" text-anchor="end">Last edited: 2 min ago</text>
  </g>
</g>

Tip: hold a hotkey while launching a game to bypass the auto-profile and force the Battery preset.

X20 出厂预设:

  • Silent:15W TDP,风扇曲线 0,封顶 40 FPS
  • Performance:25W TDP,风扇曲线自动,封顶 60 FPS
  • Turbo:35W TDP,风扇曲线最大,不限帧

多数 3A 在这台机器上要 25–30W。拉到 35W 多 ~8% 性能,代价是风扇变响 + 续航掉 25%。

打开 Armoury Crate → Settings → Performance → Per-Game Profiles,把这些作为起点:

游戏TDP帧率封顶分辨率FSR备注
赛博朋克 207728W401080pQuality关光线追踪
艾尔登法环22W601080p原生锁 60
极限竞速:地平线 630W601080pPC 端优化最好的之一
博德之门 325W401080pBalanced第 3 章需要更高 TDP
绝地潜兵 225W601080pCPU 密集
黑神话:悟空30W401080pQuality我们测过最重的
哈迪斯 II15W601080pSilent 模式就够
星际火狐(Switch 2)18W601080p模拟器,很轻

带帧时间数据的逐游戏深度拆解,看我们的 ROG Ally X20 逐游戏 TDP 调校指南

7. 手柄:重映射背键 + 开启陀螺仪

X20 的默认键位对大多数游戏够用,但背键(L4/R4/L5/R5)完全被浪费了 —— 而它们是你能拿到的最大 QoL 提升。
Back-Button Layout & Recommended Bindings L4 / R4 / L5 / R5 — 4 paddles · mapped per game genre

Back of device (top-down)
<!-- Device silhouette -->
<path d="M 60 60 L 340 60 Q 360 60 360 80 L 360 280 Q 360 300 340 300 L 60 300 Q 40 300 40 280 L 40 80 Q 40 60 60 60 Z"
      fill="#1a1f2e" stroke="#0066FF" stroke-width="2"/>

<!-- Shoulder buttons (L1, R1) -->
<rect x="30" y="40" width="80" height="20" rx="4" fill="#0066FF"/>
<text x="70" y="54" font-size="11" font-weight="700" fill="#fff" text-anchor="middle">L1</text>

<rect x="290" y="40" width="80" height="20" rx="4" fill="#0066FF"/>
<text x="330" y="54" font-size="11" font-weight="700" fill="#fff" text-anchor="middle">R1</text>

<!-- Triggers (L2, R2) -->
<rect x="30" y="20" width="80" height="14" rx="4" fill="#9b59ff"/>
<text x="70" y="32" font-size="10" font-weight="700" fill="#fff" text-anchor="middle">L2</text>

<rect x="290" y="20" width="80" height="14" rx="4" fill="#9b59ff"/>
<text x="330" y="32" font-size="10" font-weight="700" fill="#fff" text-anchor="middle">R2</text>

<!-- Back paddles (L4, R4) -->
<rect x="50" y="90" width="60" height="36" rx="8" fill="#ff6b35" stroke="#fff" stroke-width="2"/>
<text x="80" y="113" font-size="16" font-weight="800" fill="#fff" text-anchor="middle">L4</text>

<rect x="290" y="90" width="60" height="36" rx="8" fill="#ff6b35" stroke="#fff" stroke-width="2"/>
<text x="320" y="113" font-size="16" font-weight="800" fill="#fff" text-anchor="middle">R4</text>

<!-- Back paddles (L5, R5) -->
<rect x="50" y="230" width="60" height="36" rx="8" fill="#00d4aa" stroke="#fff" stroke-width="2"/>
<text x="80" y="253" font-size="16" font-weight="800" fill="#0a0e1a" text-anchor="middle">L5</text>

<rect x="290" y="230" width="60" height="36" rx="8" fill="#00d4aa" stroke="#fff" stroke-width="2"/>
<text x="320" y="253" font-size="16" font-weight="800" fill="#0a0e1a" text-anchor="middle">R5</text>

<!-- Center: grip hint -->
<text x="200" y="180" font-size="13" fill="#8b96a8" text-anchor="middle">Center grip area</text>
<text x="200" y="200" font-size="11" fill="#8b96a8" text-anchor="middle">(natural palm rest)</text>

<!-- Annotation arrows -->
<g transform="translate(-30 0)">
  <text x="0" y="113" font-size="11" fill="#ff6b35" font-weight="700" text-anchor="end">Index</text>
  <text x="0" y="143" font-size="10" fill="#8b96a8" text-anchor="end">fingers</text>
</g>

<g transform="translate(390 0)">
  <text x="0" y="113" font-size="11" fill="#ff6b35" font-weight="700">Index</text>
  <text x="0" y="143" font-size="10" fill="#8b96a8">fingers</text>
</g>

<g transform="translate(-30 0)">
  <text x="0" y="253" font-size="11" fill="#00d4aa" font-weight="700" text-anchor="end">Middle</text>
  <text x="0" y="283" font-size="10" fill="#8b96a8" text-anchor="end">fingers</text>
</g>

<g transform="translate(390 0)">
  <text x="0" y="253" font-size="11" fill="#00d4aa" font-weight="700">Middle</text>
  <text x="0" y="283" font-size="10" fill="#8b96a8">fingers</text>
</g>
Recommended bindings by genre
<!-- FPS / Action -->
<g transform="translate(0 40)">
  <rect width="580" height="76" rx="8" fill="#0d1428" stroke="#ff6b35" stroke-width="1.5"/>
  <text x="16" y="22" font-size="13" font-weight="700" fill="#ff6b35">FPS / Action (Cyberpunk, Doom, Apex)</text>
  <g font-size="12" fill="#c0c8d8">
    <text x="16" y="44">L4 → Jump</text>
    <text x="160" y="44">R4 → Crouch / Slide</text>
    <text x="340" y="44">L5 → Melee</text>
    <text x="460" y="44">R5 → Reload</text>
    <text x="16" y="64" font-style="italic" fill="#8b96a8">Pinky stays free for L1/L2 aim</text>
  </g>
</g>

<!-- RPG / Adventure -->
<g transform="translate(0 128)">
  <rect width="580" height="76" rx="8" fill="#0d1428" stroke="#9b59ff" stroke-width="1.5"/>
  <text x="16" y="22" font-size="13" font-weight="700" fill="#9b59ff">RPG / Adventure (BG3, Elden Ring)</text>
  <g font-size="12" fill="#c0c8d8">
    <text x="16" y="44">L4 → Dodge / Roll</text>
    <text x="180" y="44">R4 → Use item</text>
    <text x="320" y="44">L5 → Map</text>
    <text x="420" y="44">R5 → Menu</text>
    <text x="16" y="64" font-style="italic" fill="#8b96a8">Allows trigger combat without moving thumbs off sticks</text>
  </g>
</g>

<!-- Platformer / Indie -->
<g transform="translate(0 216)">
  <rect width="580" height="76" rx="8" fill="#0d1428" stroke="#0066FF" stroke-width="1.5"/>
  <text x="16" y="22" font-size="13" font-weight="700" fill="#0066FF">Platformer / Indie (Hades, Celeste)</text>
  <g font-size="12" fill="#c0c8d8">
    <text x="16" y="44">L4 → Jump</text>
    <text x="140" y="44">R4 → Dash</text>
    <text x="260" y="44">L5 → Attack</text>
    <text x="380" y="44">R5 → Special</text>
    <text x="16" y="64" font-style="italic" fill="#8b96a8">Removes thumb fatigue on long sessions</text>
  </g>
</g>

<!-- Emulator / Co-op -->
<g transform="translate(0 304)">
  <rect width="580" height="76" rx="8" fill="#0d1428" stroke="#00d4aa" stroke-width="1.5"/>
  <text x="16" y="22" font-size="13" font-weight="700" fill="#00d4aa">Emulator / 8-player co-op (NSO, SteamWorld)</text>
  <g font-size="12" fill="#c0c8d8">
    <text x="16" y="44">L4 → Start</text>
    <text x="140" y="44">R4 → Select</text>
    <text x="280" y="44">L5 → L-stick click</text>
    <text x="440" y="44">R5 → R-stick click</text>
    <text x="16" y="64" font-style="italic" fill="#8b96a8">Lets you navigate menus without dropping the d-pad</text>
  </g>
</g>
⚠ Setup tip Armoury Crate → Command Center → per-game profile. Enable "Back-button always on" so bindings persist across reboots and Windows updates.

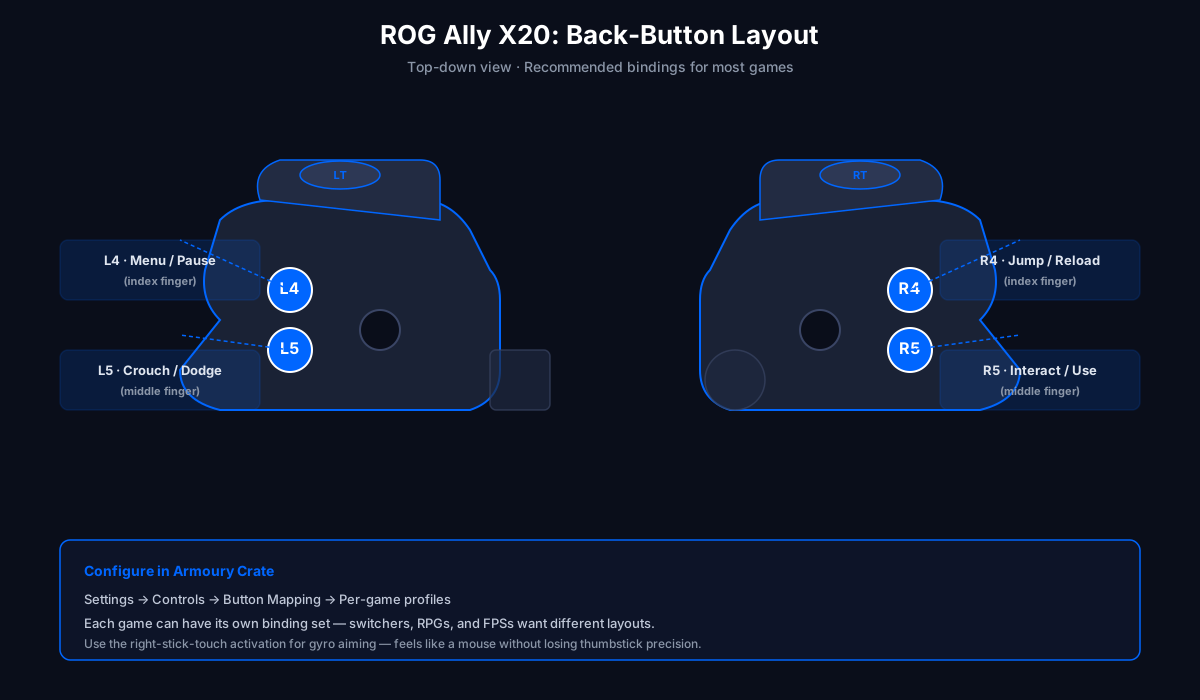
推荐绑定(适合 80% 游戏):

  • L4:游戏内菜单 / 暂停
  • R4:跳跃(平台跳跃游戏)/ 换弹(射击)
  • L5:蹲 / 闪避
  • R5:互动 / 使用

Armoury Crate → Controls → Button Mapping → Per-game profiles 配置。

陀螺仪瞄准 —— 每个 FPS 游戏都该开

X20 的陀螺仪是所有掌机里数一数二的实现。多数人觉得它是鸡肋,因为默认灵敏度太高

  1. 打开 Armoury Crate → Controls → Gyro
  2. 启用 Gyro。
  3. Gyro Sensitivity 先设 30%
  4. Gyro ActivationRight Stick Touch(物理触到右摇杆才启用 —— 类似 Steam Controller / Switch)。
  5. 打几把《绝地潜兵 2》或《Apex》,以 5% 为单位上下调,直到你不再意识到它在工作。

更深入的逐游戏配置文件讲解,见 ROG Ally X20:单游戏 TDP 调优 —— 那里每款我们测过的游戏的配置文件都包含陀螺仪配置 YAML。

8. 进阶调校(被多数教程跳过的 +15% 性能)

用 Ryzen Controller 降压

Z2 Extreme 出厂就有约 50mV 降压空间。降压不会降低性能 —— 它让芯片撞到温度墙前能 boost 更久。

  1. 从 GitHub 装 Ryzen Controller(那个还能在 Z2 Extreme 上跑的民间 fork)。
  2. 打开它,进 Curve Optimizer
  3. All-Core Curve Optimizer 先设 -50mV
  4. 跑 30 分钟压力测试(Cinebench R24 多核循环)。
  5. 30 分钟不崩,试 -75mV;稳定就试 -100mV
  6. 日常用从最低稳定值回退 25mV。

**结果:**同样 TDP 下温度降 10–15%,或同样温度下持续性能高 10%。

**警告:**不要在最大 TDP boost 时同时跑大负值 Curve Optimizer,会崩。先在 25W 测降压,再去 30W 复测。

关 VBS / HVCI 拿回约 5% 游戏性能

Windows 11 的 Virtualization-Based Security 会带来掌机不需要的开销。关掉它能在 CPU 密集型游戏里拿回 3–8%。

  1. 设置 → 隐私和安全 → Windows 安全 → 设备安全 → 内核隔离
  2. 内存完整性
  3. 重启。
  4. 管理员命令提示符跑:bcdedit /set hypervisorlaunchtype off
  5. 再重启。

代价是少一些漏洞缓解。对专用游戏掌机值得,对工作笔记本不值。

选对电源计划

Windows 默认是”平衡”。游戏请切到高性能:

  1. 控制面板 → 电源选项 → 高性能(或者跑过 powercfg -duplicatescheme 的话是”卓越性能”)。
  2. 更改计划设置 → 更改高级电源设置
  3. 处理器电源管理 → 最小处理器状态 插电设 100%,电池设 25%
  4. PCI Express → 链路状态电源管理关闭

屏幕:60Hz vs 120Hz

屏幕是 120Hz,但 Z2 Extreme 在原生 1080p 下多数 3A 跑不到 90+ FPS。建议:

  • 60Hz 用于任何有帧节奏问题的 3A
  • 120Hz 用于独立 / 复古 / 2D 和 Switch 模拟器

你也可以在 Armoury Crate → Display 里开 VRR(可变刷新率)。开 VRR 后,屏幕跟着 GPU 的实际帧率刷新,既消除撕裂,又比 VSync 输入延迟低。

9. 常见问答

Q:Ally X20 真的能在 3A 里跑 1080p 吗? A:能,需要 FSR。无 FSR 原生 1080p 在优化好的游戏里可行(《极限竞速:地平线 6》《绝地潜兵 2》《艾尔登法环》)。《赛博朋克 2077》这种重的至少 FSR Quality。

Q:电池真的是 80Wh? A:是 —— 所有掌机里最大。3A 游戏 2–3 小时,独立 / 串流 6–8 小时,视频播放 10+ 小时。

Q:风扇有多响? A:15W Silent 模式放桌下听不见。25W Performance 约 30 dB(很安静)。35W Turbo 约 38 dB —— 比 Steam Deck OLED 响,比 Legion Go 2 轻。

Q:要不要降压? A:要。看第 8 节。Z2 Extreme 稳定能跑 ~50mV 负向曲线偏移,散热改善明显。

Q:支持外接显卡吗? A:支持,通过 ROG XG Mobile(华硕私有接口,比 USB4 eGPU 快约 2 倍)。标准 USB4 eGPU 也能通过底部 USB-C 口工作,但带宽只有 XG Mobile 的 ~70%。

Q:能在这上面玩 Switch 2 游戏吗? A:能。Z2 Extreme 性能足够在最新 Ryujinx 下用 1080p/60 跑大多数 Switch 2 标题。看我们的 Tomodachi Life Ryujinx 设置教程 作示例。

10. 延伸阅读

修订修订记录

  1. v1.1
    • 编辑审校 — 已对照最新稳定版核对内容。
  2. v1.0
    • 首次发布。